Making your own website shouldn't be too difficult. Hosting companies like Godaddy or Hostgator make it super easy for anyone to get started; they allow you to create a whole website without ever writing code. For most people, it is plenty to run a WordPress blog. If this is what you are looking for you should head to Godaddy.com right now. We are done here. But on the other hand, if you want to have control and not be limited by the short comings of a shared hosting without busting your wallet, you have come to the right place.
Before we get started please let me ask you this very important question:
Why do you need a website?
Don't answer me now. I will assume that you are trying to make the world a better place by creating an amazing tool. Most website die out because they were built for no apparent reason.
Part I
In part 1, I will introduce all the tools we need to set up a foundation from which our website will be created. Security will be very briefly touched. At the end of this part, you will be able to select a hosting company, choose an OS and install all the essentials to have a website running.
Note: For this tutorial I use vim as a text editor. You can learn vim just enough to be dangerous right here.
Different components of a website.
We will be looking into building a website from scratch so you might see some things here that are not usually covered on beginners tutorial.
- Hosting
- Operating system
- Web Server
- Server-side programming language
- Database
Yes, you need an operating system to run a website. Don't run away yet, I promise you this will be easier than you think. This is still a beginners tutorial and it should be fairly easy to follow.
Hosting and Operating System
A hosting service will allow you to make your website accessible to the world. Basically you will "host" your code on a server and this server (provided by a company) can be accessed via the web. For a small project like this, there is no need to shop for a hosting company. Digitalocean will do an amazing job and for a very affordable price.
Like it is advertised, you can spin up a new VM in a matter of seconds. All we need is a fresh instance of Ubuntu Server OS and we are good to go. With Digitalocean you only pay for the time when the server is used. So feel free to go there right now and create an account with them.
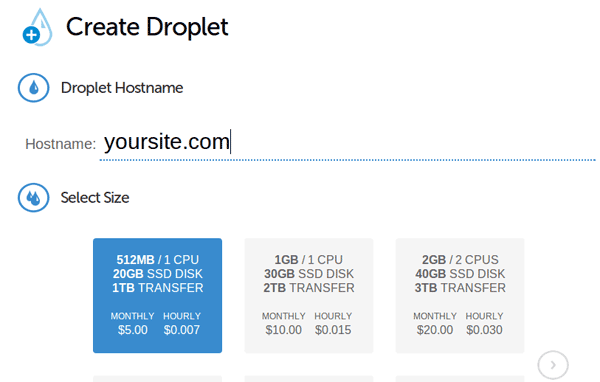
Create a new Droplet (a VM (Virtual Machine (a server)))

In the Hostname field enter the name of your site. Ex: yoursite.com
and we will leave the default 512MB Ram and 20G SSD storage, that should be plenty.
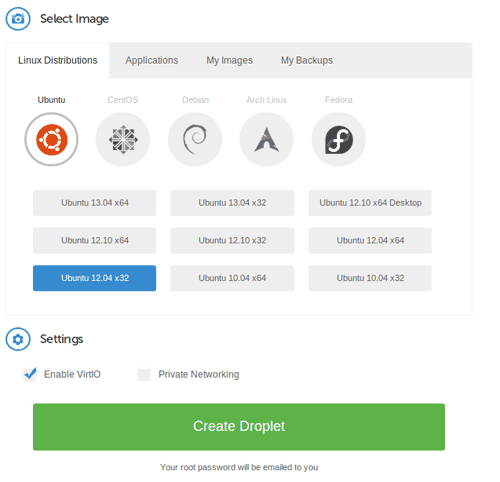
Select Ubuntu as our OS and the version will be Ubuntu 12.04 x32 (Or the most recent). Click on create droplet to create the VM.
It only takes a few seconds for the droplets to be created.
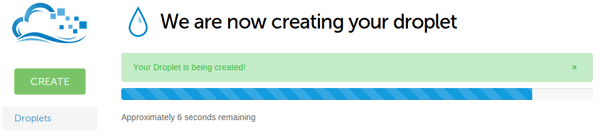
Digitalocean brags about being able to spin up a new VM in a matter of seconds
In the meanwhile head over to your email. You should receive a password from digital ocean.
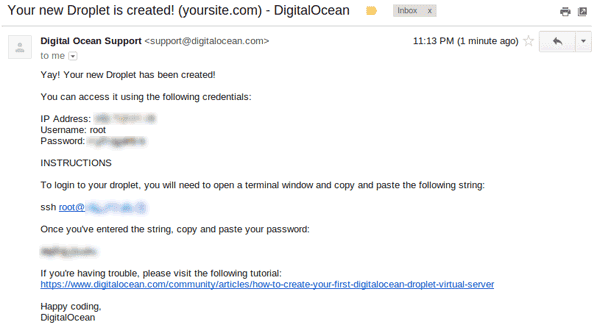
Digitalocean new droplet email
Great! Our server is now ready. You can connect to it using the console access button, but I would recommend using a terminal. If you are on a windows machine, I recommend using PuTTY for free.

Droplet summary page
Open your terminal and type this to connect:
ssh root@<your new server ip>
The server ip can be found in the email or on the droplet summary page. The password is in the email.
Once we are in lets start with updating the server right away. Type these two commands:
apt-get update
apt-get upgrade
One more thing that will be crucial is to install a good text editor. My favorite is VIM you can use whatever that you are familiar with.
apt-get install vim
Quick Note
We have successfully installed a working Ubuntu Server that is available to us via the web. Ubuntu is a flavor of the Linux operating system. It is very easy to configure and best of all, it is free.
OK, we are now set. We have a machine that we can connect to and we can set up the basic tools to host our website.
Setting up the basic
For security purposes, we will setup a new user account and disable remote log in using the root user.
Let's connect to our server:
ssh root@<server ip address>
Replace <server ip address> with the ip address provided by digital ocean. Now let's create a user:
adduser <your username>
Enter a password and some basic information and you have a new user. Let's add this new user to the super user group, this allows you to have sudo privileges on this system:
usermod -a -G sudo <your username>
Awesome now we have a new user with sudo privileges, before we disable remote login for the root user let's change the default port number for connecting with ssh.
The port number is located in the sshd_config file.
vim /etc/ssh/sshd_config
We will use port 999 in our case. Change the line that says Port 22 to:
Port 999
In the same file, Set the PermitRootLogin property to no:
PermitRootLogin no
Now remote login for root has been disabled. Let's restart the ssh server:
service ssh restart
You can now log out using the exit command and log in with your new username and port number:
ssh <your username>@<server ip> -p 999
You are now logged in.
Web Server
The web server, as the name suggest, will be serving your files through the web. It will handle HTTP connections to our server and run the appropriate code to display the correct page to the user. We will use the most popular one, Apache.
Installing apache on Ubuntu is fairly easy:
sudo apt-get install apache2
and that is all. After the installation, you can open your favorite browser and go to:
http://<your server ip>
and you will see the server default page:
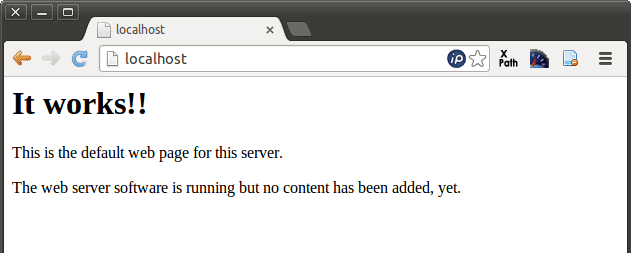
Apache default page at `/var/www/index.html`
This mean apache has been successfully installed.
The file being served is located under the default web root folder:
/var/www/index.html
You can edit it and see how the page updates in the browser.
We didn't install all this just so we can serve boring static pages. Let's install a programming language.
PHP for server-side programming

PHP is a very powerful language that can be used to make your website dynamic. It is simple enough for most people to learn it very fast and it has a very large community that can help you find answers all over the web. Let's get to it:
sudo apt-get install php5 libapache2-mod-php5
2015-05-20 Update: Because of some stupid reason You have to run this command too:
sudo apt-get install php5-json
Let's restart the server for the changes to make effect:
sudo service apache2 restart
Now let's go to our web root and add a simple test file, index.php:
cd /var/www/;
vim index.php;
Now copy and paste this code into it:
<html>
<head>
    <title>Simple test page from idiallo.com</title>
</head>
<body>
<?php if (!isset($_GET['myname'])):?>
    <form action="index.php" method="get">
        <label for="name">Enter your name:</label>
        <input name="myname" type="text" id="name"/>
        <input type="submit" value="Send" />
    </form>
<?php else:?>
<h1>Welcome <?php echo $_GET['myname']?></h1>
<?php endif;?>
</body>
</html>
Save it and go to http://<your server ip>/index.php you should see a nice little form and when you enter your name and press enter, the name is displayed on the page. There! This is a very simple test just to make sure php is working correctly.
The Database
The data base will be the repository where all your website data will be stored. This can include a blog post, users profiles, tweets, products info, or any information your website will need. We will use MySQL for this.
sudo apt-get install mysql-server libmysqlclient-dev
You will be prompted to enter a root password. Make sure you use a good password and please write it down, we will use it to connect to our database.
One thing that I always forget to do is tie MySQL to PHP so here goes:
sudo apt-get install php5-mysql
This will do for now.
Summary
We now have a fully functional server running LAMP (Linux Apache MySQL PHP).
- We chose Digital ocean as a hosting provider
- We installed Ubuntu as our operating system and set up a user account
- We installed a fully functioning web server now accessible via
http://<server ip> - We installed PHP as our programming language to make websites dynamic
- We installed MySQL as our database to store our website information.
What's next?
On the next tutorial, we will learn more about apache and mysql by setting up a WordPress blog.
Comments
There are no comments added yet.
Let's hear your thoughts